
Text by BRYAN PERRETT, colour plates by PETER SARSON and TONY BRYAN
BRITISH TANKS in N. AFRICA 1940-42
Light Tank M3 Stuart
For full details of use in North Africa and technical description, see Vanguard No. 17. The Stuart's mechanical reliability, and refusal to shed tracks whatever the provocation, together with a 36mph top speed, earned it the heart-felt nickname 'Honey'. With 37mm frontal armour, a 37mm gun and a weight of 13½ tons it had more in common with British Cruiser than Light tanks, and its first major desert battle was in 'Crusader', when it equipped three regiments of 4th Armoured Brigade (8th KRIH, 3 and 5 RTR). It served on for the rest of the campaign, generally limited to regimental Light squadrons and recce troops.
Crusader II of HQ, 'C' Sqn., 6 RTR prior to Operation 'Crusader'. 'F-names' adorned many of the battalion's tanks below the squadron mark - e.g. 'Ferocious'. Netting and tank 'bivvy' sheets are strapped front and rear. A cloth squadron commander's pennant flies above tin ID pennants - a common replacement for cloth ones, which quickly became tattered. (RAC Tank Museum).
Medium Tank M3, Lee/Grant
For full details of use in North Africa and technical description, see Vanguard No. 6. The sponson-mounted 75mm main armament of these tanks, the 340hp - 375hp engines, and the 65mm armour gave 8th Army a chance to meet the DAK Panzers on something like equal terms at last; but the unsound layout prevented hull-down firing. First in action in the Gazala/Knightsbridge battles with 4th Armoured Brigade, the M3 series remained 8th Army's main battle tank at First Alamein and Alam Haifa; it fought at Second Alamein, although by then the Sherman had begun to overshadow its importance, and a few survivors reached Tunisia.
Medium Tank M4, Sherman
The mainstay of British armoured divisions from Second Alamein onwards, the Sherman is described in detail in Vanguard No. 15. At 30 tons, with 76mm frontal armour and a conventionally turret-mounted 75mm gun, the Sherman put 8th Army crews on almost an equal footing with the DAK. Its presence in numbers at Second Alamein was partly clue to President Roosevelt's entirely characteristic generosity in stripping his own incomplete 1st Armored Division as replacements for part of the first North African shipment which had been lost at sea. The cast-hull M4A1 (Sherman II) was the most common 8th Army type, but the welded-hull M4 and M4A2 (Shermans I and III respectively, the latter diesel-engined; were also used.
The only tank gun to serve throughout the campaign was the 2-pdr., which was an adequate weapon for the first year of the war, just acceptable for the second, and hopelessly out-ranged for the third. It would have been replaced by the 6-pdr. much earlier had not the BEF lost so much equipment at Dunkirk, the subsequent invasion scare leaving factories no time to re-tool. By the time the 6-pdr. entered service it was still a match for the German 50mm L/42, but was quickly overtaken by the 50mm L/60. The American 75mm gun provided a temporary weapon superiority, although this soon disappeared when the Germans began fitting their PzKpfw IV with the 75mm L/48 gun. Fortunately these vehicles were never sufficiently numerous to affect the overall position, and the 88mm-armed Tiger was only encountered in small numbers in Tunisia.
November 1941: a Matilda with extra sand-bag protection, possibly flying the blue battalion commander's flag with white number of 4 RTR below the 'two top, blue' pennants ordered as ID by 32nd Army Tank Bde. for 'Crusader'.
At this period the 2-pdr. and the 6-pdr. fired only armour-piercing shot, and could not reply effectively to anti-tank guns, which usually outranged them. Because of this the Close Support tank was developed, armed with a 3in. howitzer which fired a high-explosive shell, and one or two tanks of this type operated under the control of squadron headquarters. This was a less satisfactory solution to the problem than that practised by the Panzerwaffe, who, until 1942, maintained an entire company of 75mm L/24 howitzer PzKpfw IVs as part of the Panzer battalion establishment. The American 75mm gun, firing both AP and HE, placed British crews in a much happier position when confronted with an antitank gun screen.
However, the uncomfortable feeling of being out-gunned was to haunt the Royal Armoured Corps throughout the campaign and beyond, and the fact was that the Germans were much quicker to get larger weapons into their tanks, spurred on by their experiences on the Eastern Front. (See also Vanguard Nos. 16, The Panzerkampfwagen III, 18, The Panzerkampfwagen IV, and 20, The Tiger Tanks.) German optical equipment, including gun sights, was also superior to British and American. A high percentage of British losses were, however, caused by Panzerjäger and antitank guns rather than in tank-v-tank fighting, and although many of these were put down to the dreaded '88' the 50mm and 75mm anti-tank guns, well sited, could be just as deadly.
When Operation 'Compass' was mounted, the 7th Armoured Division consisted of two armoured brigades, each of three armoured regiments and an anti-tank battery; a Support Group which included a field artillery regiment and two motorised infantry battalions; and divisional troops including an armoured car regiment, an anti-tank/anti-aircraft regiment, and Royal Engineer and logistic support units.1 The armoured brigades were equipped with Light tanks and Cruisers A9, A10 and A13. As the campaign progressed the composition of these changed and the divisional commander, Major-General O'Moore Greagh, insisted that each regiment should contain at least one Cruiser squadron - 3rd Hussars and 2 RTR accomplished this by exchanging B Squadrons, including personnel, respective regimental equipment being Lights and Cruisers. The Support Group was deployed by the divisional commander as a pivot of manoeuvre which could provide fire support for the armoured brigades' missions and could also form a rallying point.
1For the full order of battle see Vanguard No. 1, 7th Armoured Division 1940-45
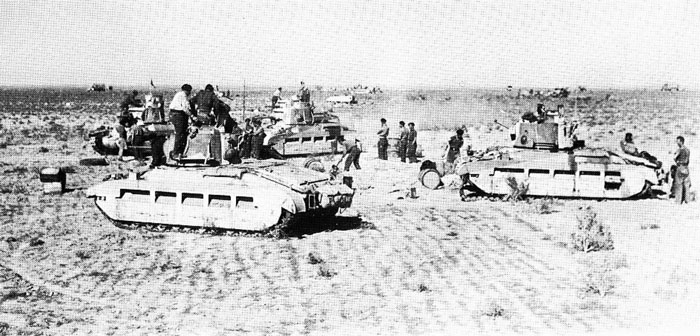
7 RTR refuel, replenish ammunition and repair minor damage at a 'Forward Rally' during the Sidi Barrani operations of December 1940; the broken track (right) is mine damage
The 7th Armoured Division's basic organisation had apparently changed little for Operation 'Battleaxe', although the nature of the operation has been misunderstood. The plan called for 7th Armoured Brigade (2 RTR with A9s, A10s and A13s and 6 RTR with Crusaders) to work its way round the southern flank of the Axis frontier defences and advance towards Tobruk. Simultaneously the 4th Indian Division with 4th Armoured Brigade (4 and 7 RTR, both Matilda regiments) under command, would storm those defences at Halfava Pass, Solium and Fort Capuzzo. In theory, the infantry would then release 4th Armoured Brigade, which would then revert to the control of 7th Armoured Division, but, in the event, neither wing of the offensive was successful. That part of the latter was equipped with Matildas was not, as has been stated elsewhere, because 'nothing else was available'; these objectives were strongly fortified and it was considered, rightly, that only heavily armoured Infantry tanks could suppress them. Again, since more than one regiment was employed, an intermediate brigade headquarters was necessary, and that was supplied by HQ 4th Armoured Brigade, which was otherwise unemployed.
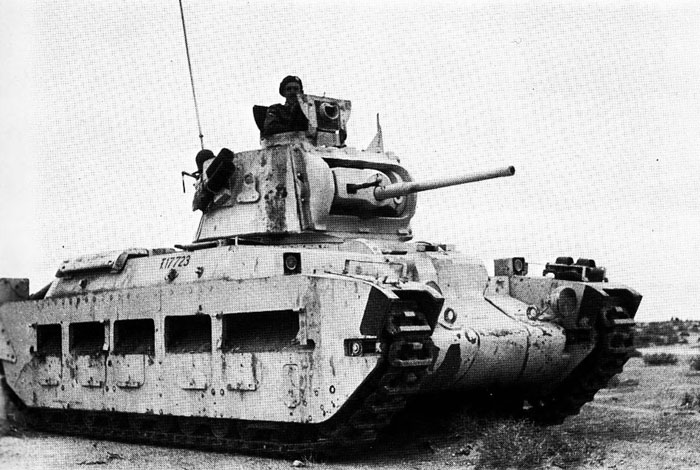
By March 1942 the over striping had generally given way to overall Light Stone, and this Matilda, T.17723, has areas of UK green paint visible on the front 'horns' showing where the sandshields have been removed.
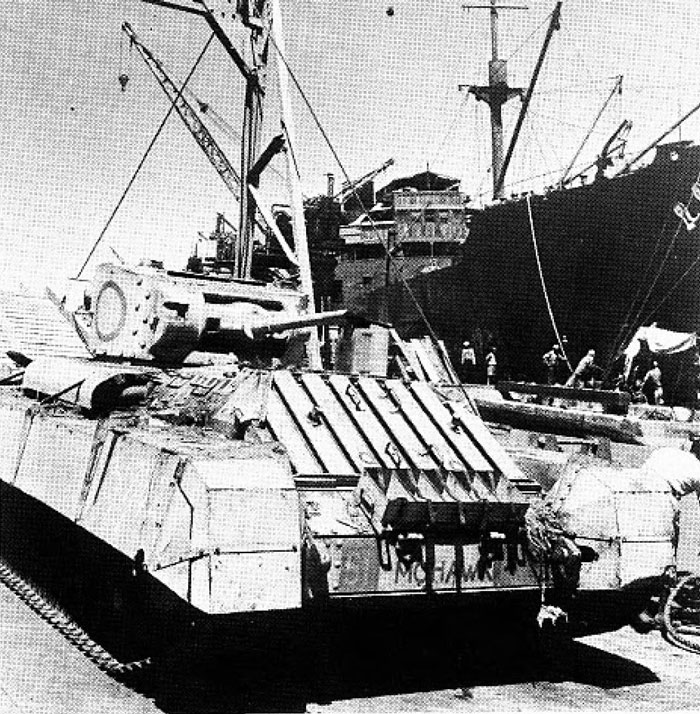
Shipped from the UK in 1942 as the War Cabinet's 'floating option', for commitment to Australia if Japan invaded or for Middle East reinforcements, 8th Armd. Div. was pre-painted in tropical colours and had some markings obliterated. Landing at Suez in July, 23rd Armd. Bde. was hurriedly prepared for action; for the sake of speed many tanks were taken over from 24th Armd. Bde., whose personnel were still at sea. This 40 RTR Valentine unloading from a Z-Lighter follows common regimental practice in being named after a warship - 'Mohawk'; the div. sign is overpainted. See also Plate E1.
During 'Crusader' the 7th Armoured Division was roughly the size of a Panzer corps. It deployed no less than nine armoured regiments organised in three armoured brigades, the 4th with Stuarts, the 7th with Crusaders and older Cruisers, and the 22nd with Crusaders; the 4th was actually a Brigade Group, and incorporated an artillery regiment and a motorised infantry battalion. The Support Group contained two 25-pdr. regiments, an anti-tank regiment and two infantry battalions. Divisional troops included three armoured car regiments, an anti-tank regiment, an anti-aircraft regiment, and logistic services. This organisation was too unwieldy for a single divisional headquarters to control satisfactorily, and was difficult to administer; nor was the formation a balanced one, having too much armour in proportion to the available artillery and infantry.
These defects were duly noted in the 1942 reorganisation of the British armoured division, under which the number of armoured brigades was reduced to one, consisting of three armoured regiments and a motorised infantry battalion. The Support Group disappeared and the second armoured brigade was replaced by a three- battalion motorised infantry brigade. Divisional troops included an armoured car regiment, four 25-pdr. regiments (one of which might be attached on a semi-permanent basis to the armoured brigade), an anti-tank regiment, an anti-aircraft regiment, and divisional services.
However, while this basic structure was adopted by armoured divisions in both the 1st and 8th Armies, several were given a second armoured brigade at various periods in their careers. Thus at Gazala, while 7th Armoured Division had one armoured brigade (the 4th), 1st Armoured Division had two (the 2nd and 22nd); and at Second Alamein the 1st Armoured Division had one (the 2nd), while the 7th Armoured Division had two (the 4th Light and the 22nd), as did the 10th Armoured Division (the 8th and 24th). An independent armoured brigade, the 9th, was attached to the 2nd New Zealand Division during the battle.1
17th Armoured Brigade, the original Desert Rats, left the Middle East after 'Crusader' to earn fresh laurels in Burma. See Vanguard No. 17, The Stuart Light Tank Series.
The internal organisation of the armoured regiment varied only in detail throughout the campaign and consisted of three fighting squadrons, a headquarters squadron incorporating the supply echelon and other administrative elements, and a reconnaissance troop of scout cars which operated under regimental control. In action the regiment was commanded from a three-tank Regimental Headquarters Troop. Squadrons were organised with four troops, each of three or four tanks, and a Squadron Headquarters Troop, usually of three. In squadrons equipped with 2-pdr. and 6-pdr. tanks, one or two SHQ vehicles would be Close Support models.
Given this structure, regiments were further organised according to their equipment. Mention has already been made of the integration of Light and Cruiser tanks during Wavell's offensive, and a similar process was followed when the better- armed Grants and Shermans began entering service. At Gazala the three regiments of 4th Armoured Brigade (8th Hussars, 3 RTR and 5 RTR) each had two Heavy squadrons of Grants and one Light squadron of Stuarts. At this time the regiments of 2nd Armoured Brigade (The Queen's Bays, 9th Lancers and 10th Hussars) and 22nd Armoured Brigade (2nd Royal Gloucestershire Hussars, 3rd and 4th County of London Yeomanry) each had one Grant Heavy squadron and two Light squadrons armed with Crusaders. During Second Alamein regiments strove to maintain two Heavy squadrons equipped with Shermans and Grants, and one Light squadron with Crusaders or Stuarts; the exceptions were the two regiments comprising 4th Light Armoured Brigade, whose equipment is described elsewhere.
The role of the armoured divisions was defined loosely as exploitation, although there was also a general acceptance of Fuller's principles of deep penetration and the benefits to be gained by using the indirect approach. These were applied brilliantly by O'Connor at Sidi Barrani in December 1940 and again at Beda Fomm in February 1941; interestingly, O'Connor had studied neither Fuller nor Liddell Hart and later described his tactics as being merely those of common sense. After his capture in the spring of 1941 his sure touch on the helm was sorely missed.
Something of the debilitating effect of dispersion tactics has already been mentioned. These actually had their roots in O'Connor's period of command when the grossly outnumbered British were forced to stretch their forces thin and to rely on mobility to retain the initiative over the Italians. Small columns, consisting perhaps of a lorried infantry battalion, a squadron of armoured cars and a troop each of field and antitank guns, harried the Italians without respite and attained a complete moral ascendancy. After Graziani's army had been eliminated the need for such dispersed units, called 'Jock Columns' after their originator Brig, Jock Campbell of the 7th Armoured Division Support Group, disappeared. Notwithstanding, the entirely understandable urge to be 'off the leash' and to prolong the beau sabreur aspect of the war led to their continuance long after they had ceased to produce an economic return for the effort expended. The worst aspect of the Jock Columns was that their existence diluted the strength of the divisional artillery just when it was needed most to deal with the anti-tank gun aspect of the Panzer divisions' sword-and-shield tactics.

8 RTR Valentines dispersed over the desert near Bardia during Operation 'Crusader', January 1942; note the partially obliterated red/white/red flashes.
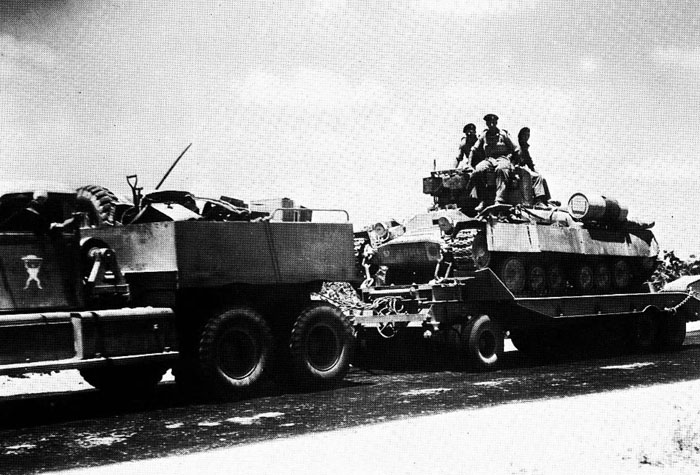
Diamond-T of No. 1 Tank Transporter Coy. RASC lifts a 50 RTR Valentine to the forward area, July 1942. The yellow 'strong man and tank' was the company insignia. Both vehicles are overall Light Stone. Valentine T.17644 carries the number on nose and sides, a large 'C' Sqn. circle, the unit serial '67' and an overpainted 8th Armd. Div. sign.; note jettison fuel tank.
Dispersion was also practised within the armoured division itself. It took far longer and cost far more than had been anticipated to achieve success in 'Crusader, and in part the reason lay in that 7th Armoured Division's three armoured brigades were deployed too far apart to be able to support each other when the need arose. As Rommel commented to a prisoner, 'What difference does it make if you have two tanks to my one, when you spread them out and let me smash them in detail? You presented me with three armoured brigades in succession.'
The fault was far from being cured at Gazala, and was indeed compounded by a thoroughly unsatisfactory relationship between the army commander and his two corps commanders, which led to debate when decision was required and to temporisation when action was needed. It was ironic that in this battle, in which the British for once decisively out-gunned their opponents, they should suffer their worst defeat. Significantly, the tank crews knew exactly what was wrong and also its cure; a soldier of 5 RTR wrote to his family, 'It seemed to me that if they [i.e. his generals] had got a lot of kit together and had one big push in one place, we could have done something definite. As it was, the units were just battering themselves to pieces in a lot of little scraps which were getting us nowhere.'
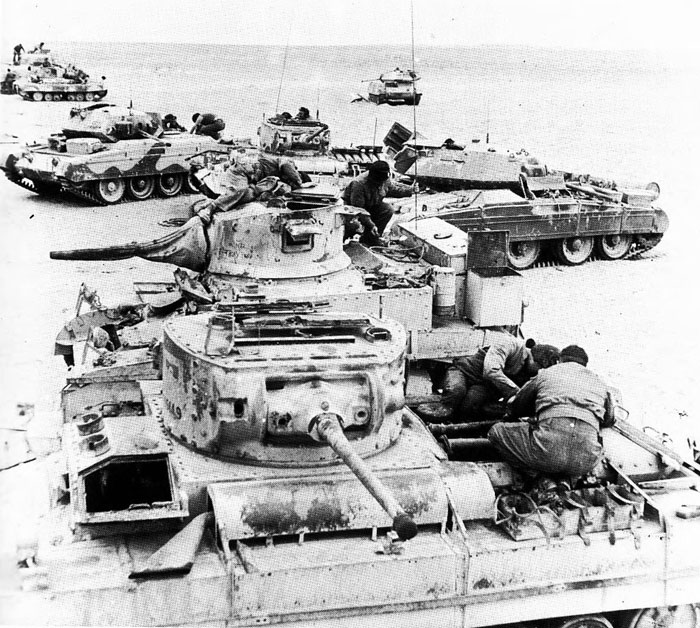
Desert workshops; in the left background a Sherman dwarfs a Valentine, with a Crusader, more Valentines and a Stuart nearer the camera. On the right is a rare Covenanter
Rommel's dashing style of forward control has sometimes been cited as a contrast to the 'bumbledom' affecting the British army command at this period of the war. In fact it merely provided a contrast in inefficiencies. Rommel was frequently out of contact with his staff and unaware of crucial developments, was supremely lucky to avoid capture on several occasions, and was rescued from disaster by his opponent's mistakes. Nonetheless, the long British retreat to Alamein was made with the sickening smell of defeat hanging over the 8th Army, and a feeling that Rommel always seemed to be just one jump ahead, A certain staleness was inevitable, accompanied by an unhealthy cynicism. In addition, it had always been slightly resented by the Commonwealth troops that all the armoured formations were British, and at Mersa Matruh this resentment turned to an active if temporary dislike when the New Zealanders, partially encircled, fought their way out believing (incorrectly) that the ist Armoured Division had left them in the lurch.
The entire climate changed when Montgomery arrived to command 8th Army. Incompetent commanders were sacked and the philosophy of dispersion was thrown to the winds, being replaced by an orthodoxy the like of which had not been seen in the desert since O'Connor's day. The keynote of this was concentration. The armour would fight en masse with concentrated artillery support, and battle drills would be strictly adhered to. Unlike Rommel, who was prepared to gamble, Montgomery intended to invest only in certainties.
More British armour fought at Second Alamein than in any other battle in North Africa. For the armoured divisions this was not a battle of wide, sweeping movements across the desert, but a dogfight which reached its climax at Tel el Aqqaqir on 2 November 1942 as part of the operation known as 'Supercharge'. This had begun the previous night when two infantry brigades from 50th and 51st Divisions-operating under the control of 2nd New Zealand Division-had with their Infantry tanks blown a corridor through the Axis minebelt and forward infantry defences. Through this at dawn passed the 9th Armoured Brigade on a mission that was little short of a death ride-to wipe out the enemy's anti-tank gun screen and, if necessary, incur 100 per cent casualties in doing so. The task was accomplished at a cost of 75 out of 94 tanks and, as intended, succeeded in drawing Panzerarmee Afrika onto the battlefield, to be met in turn by the 1st Armoured Division pouring through the broken line. In the day-long battle which followed the British lost slightly more tanks, but Rommel's armour was virtually written off.
In the pursuit which followed the armoured divisions reaped the harvest of victory, but were initially hindered by bad going caused by heavy rain. During the advance across Africa to the Tunisian frontier only comparatively minor actions were fought.
We have much more interesting information on this site.
Click MENU to check it out!
∎ cartalana.com© 2009-2025 ∎ mailto: cartalana@cartalana.com