
ROYAL AIR FORCE. COMMON CORE AND DEPLOYMENT SKILLS AIDE-MEMOIRE
OWNER'S DETAILS (TO BE COMPLETED IN PEN)
| First Owner of Aide-Memoire |
| Number: |
| Rank: |
| Name: |
| Second Owner of Aide-Memoire |
| Number: |
| Rank: |
| Name: |
| Third Owner of Aide-Memoire |
| Number: |
| Rank: |
| Name: |
| Fourth Owner of Aide-Memoire |
| Number: |
| Rank: |
| Name: |
ANNUAL AIDE-MEMOIRE CHECK RECORD
| Date | Checked By | ||
| Rank | Name | Unit | |
| 1 | |||
| 2 | |||
| 3 | |||
| 4 | |||
| Amdt No | Issue Date | Date Entered | Amended By |
| 1 | |||
| 2 | |||
| 3 | |||
| 4 | |||
| 5 | |||
| 6 |
NBC EQUIPMENT (TO BE COMPLETED IN PENCIL)
| Respirator Size | ** |
| NBC Suite Jacket Size | ** |
| NBC Suite Trousers Size | ** |
| NBC Gloves Inner Size | ** |
| NBC Gloves Outer Size | ** |
| NBC Boots Size | ** |
The expeditionary role of the RAF in the 21st Century demands training for deployed operations away from the home base. Meeting these high readiness contingencies such as warfighting, peace support operations, terrorist threats or NBC environments, may encompass deployment options overseas, ranging from austere bases to well-found bases.
Maintaining your individual level of worldwide deployment preparedness is essential. It is a challenge that must be met through the development of survive-to-operate skills fundamental to your survival. The main function of this aide-memoire is to support that training.
The aide-memoire can be used in 2 ways:
◉ Part 1 is designed to improve your basic survive-to-operate skills and knowledge in preparation for routine ground defence activities. It can also be used for revision of the Common Core Skills test.
◉ Part 2 concentrates on developing and maintaining your deployment skills in an operational environment.
Use this aide-memoire wisely. YOUR LIFE AND THAT OF OTHERS MAY DEPEND ON IT.
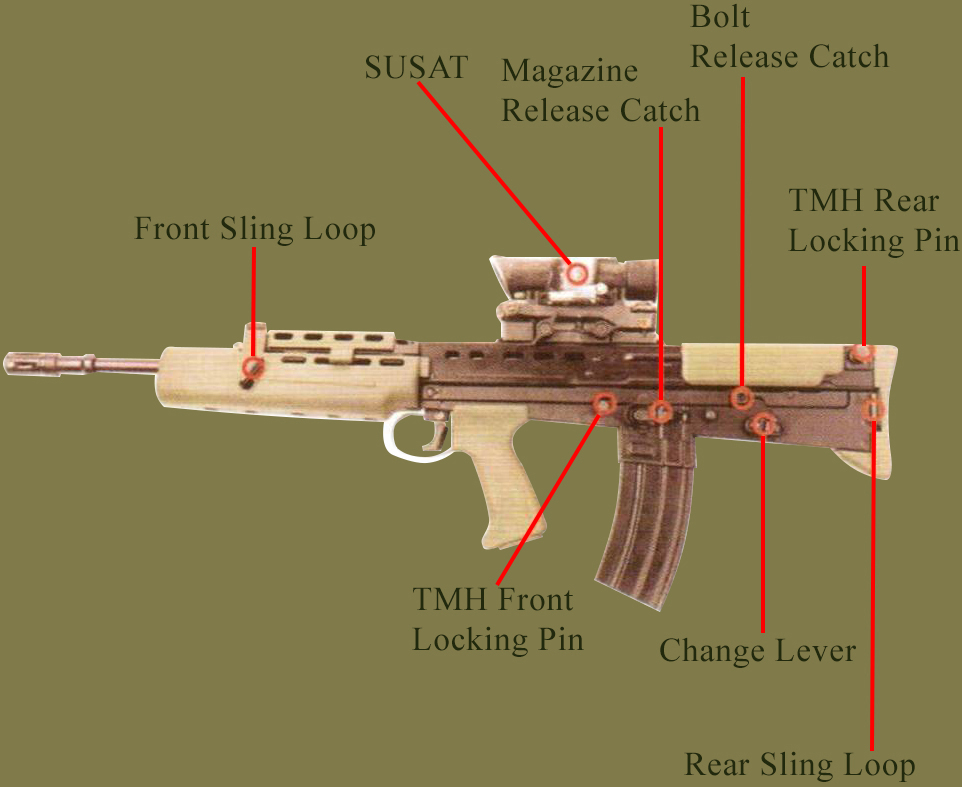
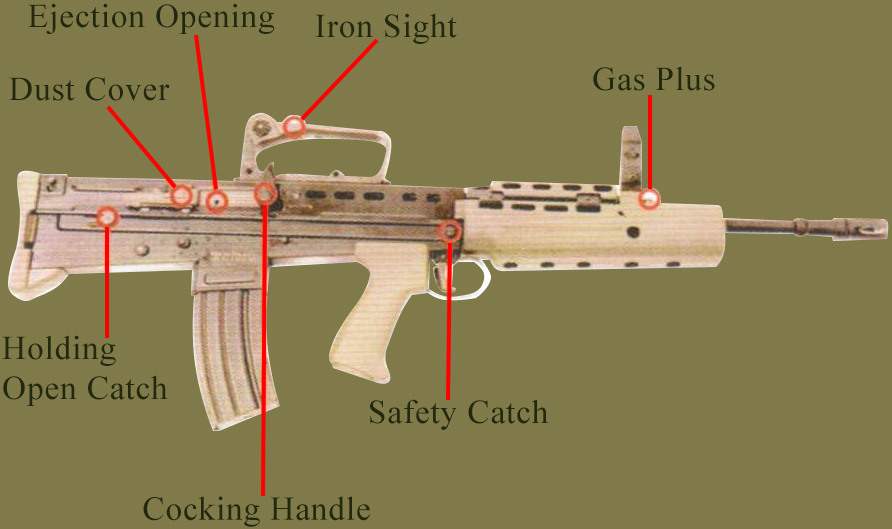
THE RIFLE - STRIPPED (A2 part identification differences shown in brackets).
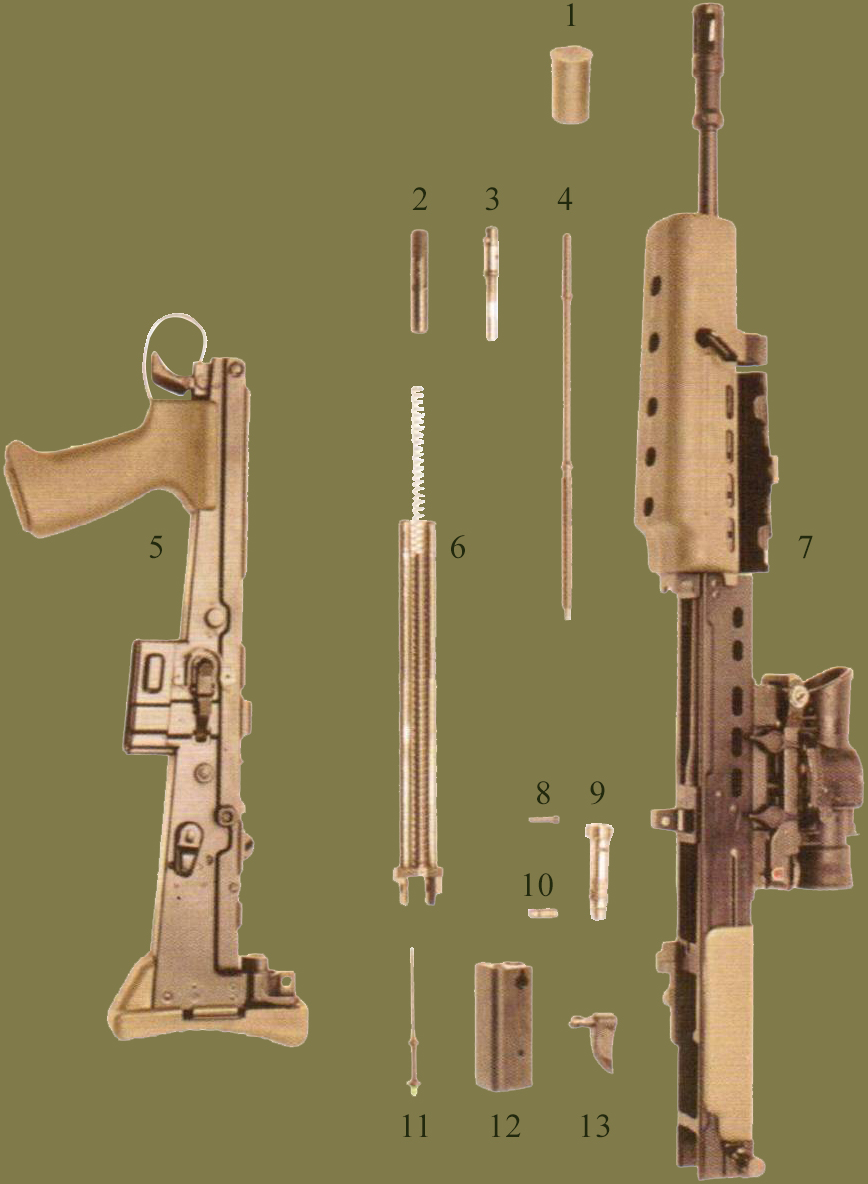
1. Muzzle Cover.
2. Gas cylinder (black, stamped HKA2).
3. Gas plug (stamped HKA2).
4. Gas piston and spring (spring only, red at base).
5. Trigger mechanism housing (stamped L85A2).
6. Recoil rod assembly (red, base of spring only).
7. Rifle body (stamped HK A2 below rear locking pin).
8. Firing pin retaining pin.
9. Bolt (stamped HKA2).
10. Cam stud (stamped HKA2).
11. Firing pin (black, painted green at base).
12. Bolt carrier (black).
13. Cocking handle (black).
The following are the only parts of the A2, which are interchangeable with the A1 (weapon stripped for normal daily cleaning):
1. Firing pin retaining pin.
2. Gas piston (NOT SPRING).
3. Return rod (NOT SPRING).
THE RIFLE AND LSW LUBRICATION POINTS
Use OX 24 on the circled points below:
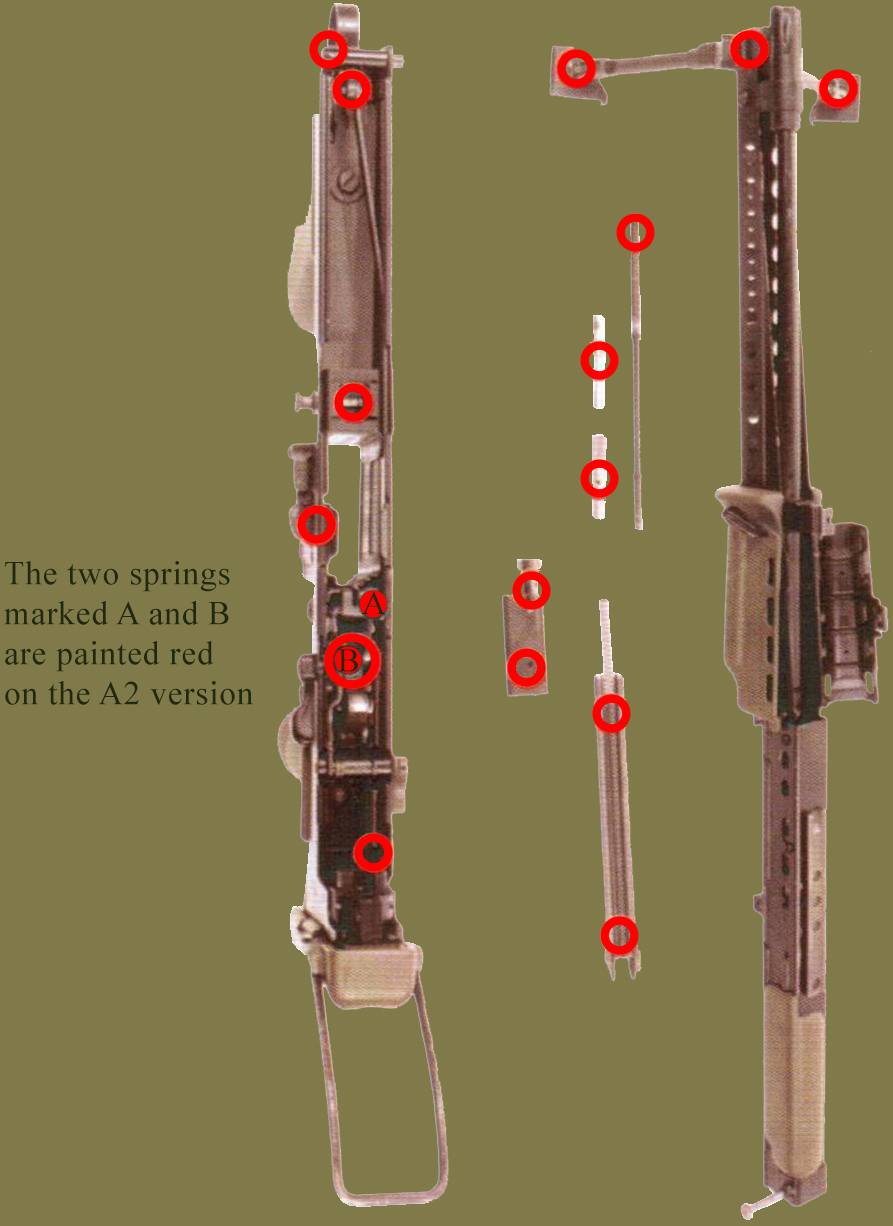
The two springs marked A and B are painted red on the A2 version.
1. Oil bottle.
2. Scotchbright.
3. Muzzle cover.
4. Combination tool.
5. 2 piece cleaning rod and handle.
6. General purpose soft brush.
7. Gas block brush.
8. Barrel extension cleaner.
9. General purpose wire brush.
10. Bore brush.
11. Chamber barrel extension brush.
12. Pull-through.
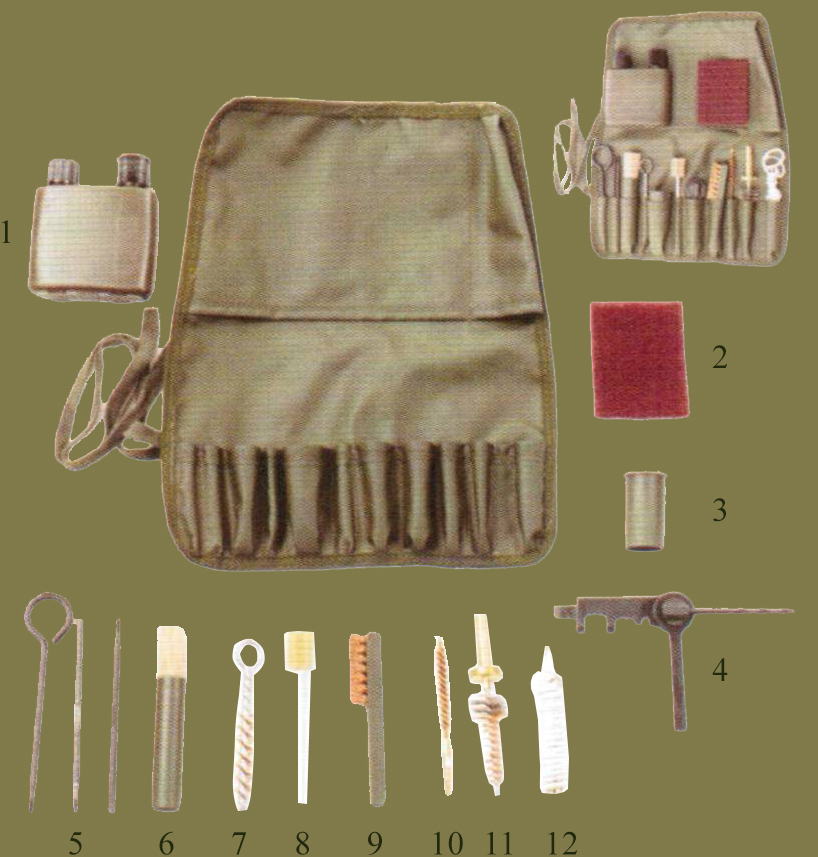
NOTE:
When items contained within the cleaning kit are worn out, they should be replaced.
NORMAL CONDITIONS
Dry clean, then examine for damage, stains or wear.
Lightly oil the weapon and magazine.
HEAVY RAIN AND DAMP CONDITIONS
Clean as normal. Keep the muzzle and sight covers fitted as long as possible. Inspect frequently for rust and remove it.
TROPICAL HUMID CONDITIONS
Clean as normal but use the special issue lubricant, anticipating a rapid return of rust.
COLD AND EXTREME COLD CONDITIONS
Clean as normal but use oil sparingly. If the temperature warrants, a special lubricant will be issued. To prevent snow from entering the barrel keep the muzzle cover fitted. To avoid condensation, do not fit the sight cover.
DRY, SANDY OR DUSTY CONDITIONS
In such conditions the outside of the rifle must be kept dry. All traces of oil should be removed from the exterior of the weapon by wiping with a dry rag. Internally the rifle should be frequently oiled. If rust appears remove it as normal, but take care to remove any oil that remains. Occasionally strip the weapon and empty out any grit which may have collected in the TMH, likewise empty the magazines and tip out any residue sand or grit. Keep the muzzle cover fitted all the time, and the sight cover, if possible.
Normal Safety Precautions (NSPs) are to be carried out at the beginning and end of every lesson, practice or range period and immediately on returning to barracks, bivouac, tent or operational base and on completion of any patrol or duty.
◉ Point weapon in a safe direction.
◉ Safety catch to 'S', change lever to 'R'.
◉ Cock the weapon; engage the holding open catch.
◉ Look into the ejection opening and inspect the weapon to ensure the body, chamber and face of the bolt are clear of ammunition or obstructions.
◉ If handing over a weapon with no magazine fitted, carry out NSPs and show the weapon is clear to the recipient as taught.
◉ At night feel with the little finger or insert the weight of a pull-through into the chamber to ensure it is clear. Release bolt, using the bolt release catch, tap forward on the cocking handle.
◉ Point the weapon in a safe direction, safety catch to 'F', then operate the trigger.
◉ Safety catch to 'S', then close the dust cover.
NOTE:
Before stripping the weapon, carry out NSPs as detailed above, but do not operate the trigger or close the dust cover. The safety catch must remain at 'S' and the hammer cocked.
The TRILUX lamp used in the SUSAT contains TRITIUM gas. In the event of a breakage, the following precautions are to be taken:
◉ The escaping gas is not to be inhaled.
◉ Cigarettes are to be extinguished immediately.
◉ Broken parts are not to be handled with bare hands.
◉ If a breakage occurs indoors, doors and windows are to be opened to allow the gas to clear, and any gas or flame heating system is to be turned off.
◉ All breakages are to be reported to the Medical Officer and to the unit armourer as soon as possible.
THE RIFLE IS NEVER TO BE POINTED AT ANYONE IN JEST
LOADING
◉ Check that the safety catch is at 'S'.
◉ Check the top round is seated correctly in the magazine.
◉ Fit the magazine to the rifle, making sure that it is secure.
UNLOADING
◉ Bring the weapon into the horizontal position, keeping the right forefinger outside the trigger guard.
◉ Put the safety catch to 'S' and open your ammunition pouch.
◉ Tilt the weapon to the right, remove the magazine and place it in your ammunition pouch.
◉ IT IS ESSENTIAL FOR SAFETY REASONS THAT THE MAGAZINE IS REMOVED AT THIS POINT.
◉ Tilt the weapon slightly to the right, cock the weapon and engage the holding open catch.
◉ Twist the weapon to the left so the ejection opening is uppermost.
◉ Inspect the body, chamber and face of the bolt carefully to ensure they are clear. Look at the magazine housing to ensure that the magazine has been removed. Once more check the condition of the body, chamber and face of the bolt as an added precaution to prevent a negligent discharge. (Remembered as the 7-point check).
◉ At night feel with the little finger or a pull-through.
◉ Operate the bolt release catch and allow the working parts to go forwards, tap forward on the cocking handle.
◉ Place the safety catch to 'F' and operate the trigger. Return the safety catch to 'S' and ensure the sights are reset to 300m.
◉ Close the dust cover, pick up any ejected round, clean it and replace it in the magazine.
NOTES:
◉ To prevent possible injury to the face or eye from ejected rounds, the weapon is NOT to be tilted to the left, when cocking during an unload.
◉ When unloading in darkness or thick vegetation, care should be taken to direct ejected rounds close to the position so that the ammunition can be readily recovered.
MAKING READY
◉ Check that the safety catch is at 'S'.
◉ Check that the change lever is at 'R'.
◉ Set the sights.
◉ Cock the rifle.
◉ Tap forward on the cocking handle.
MAKING SAFE
◉ If required, or on the command 'Make Safe', unload as taught, then put on a full magazine.
IMMEDIATE ACTION (IA) ON STOPPAGES
◉ Take cover.
◉ If the cocking handle appears to be fully forward, tap forward on the cocking handle with the left hand and continue firing.
◉ If the cocking handle is in a position other than fully forward, or fully to the rear, or if the weapon fails to fire after carrying out the drill for cocking handle fully forward, tilt the weapon slightly to the right and cock the weapon, apply the holding open catch and look into the body and the chamber.
If there are rounds in the magazine and the chamber and body are clear, check the magazine is correctly fitted, operate the bolt release catch, tap forward on the cocking handle and continue firing.
◉ If there is an obstruction in the body or chamber, remove the magazine, clear the obstruction, replace the magazine, operate the bolt release catch, tap forward on the cocking handle and continue firing.
◉ If the rifle stops firing and you find that the cocking handle is fully to the rear, and the magazine is empty, change the magazine, operate the bolt release, tap forward on the cocking handle and continue firing.
◉ If after carrying out the IA and the remedy for an empty chamber and rounds in the magazine, the weapon fires one or two rounds and stops again, and, after repeating the IA you find the same condition, operate the bolt release, tap forward on the cocking handle, put the safety catch to 'S' and, using a round or the combination tool, depress the plunger and turn the gas plug to 'E'. Put the safety catch to T and continue firing.
◉ As soon as practicable the gas assembly is to be cleaned, reset to 'N' and the combination tool returned to the cleaning roll.
◉ Any round involved in a stoppage or used as a tool is not to be re-loaded or fired.
◉ Adjust position after any stoppage and before continuing firing.
L85A2/L86A2 FUNCTION TEST
◉ Cock the weapon, put the safety catch to 'S' and attempt to fire the weapon, it should not fire.
◉ Set the change lever to 'R' and the safety catch to 'F', operate the trigger action.
◉ Whilst holding the trigger back, cock the weapon and release the trigger. The hammer should be felt/heard engaging the main sear. Operate the trigger, the weapon should fire.
◉ Set the change lever to 'A' and the safety catch to 'F'. Cock the weapon, the hammer should be held to the rear.
◉ Operate the trigger, the rifle should fire.
◉ Whilst holding the trigger back, cock the weapon.
◉ As the bolt moves forward the hammer should fall to strike the firing pin.
◉ Release the trigger, set the safety catch to 'S' and the change lever to 'R', close the dust cover.
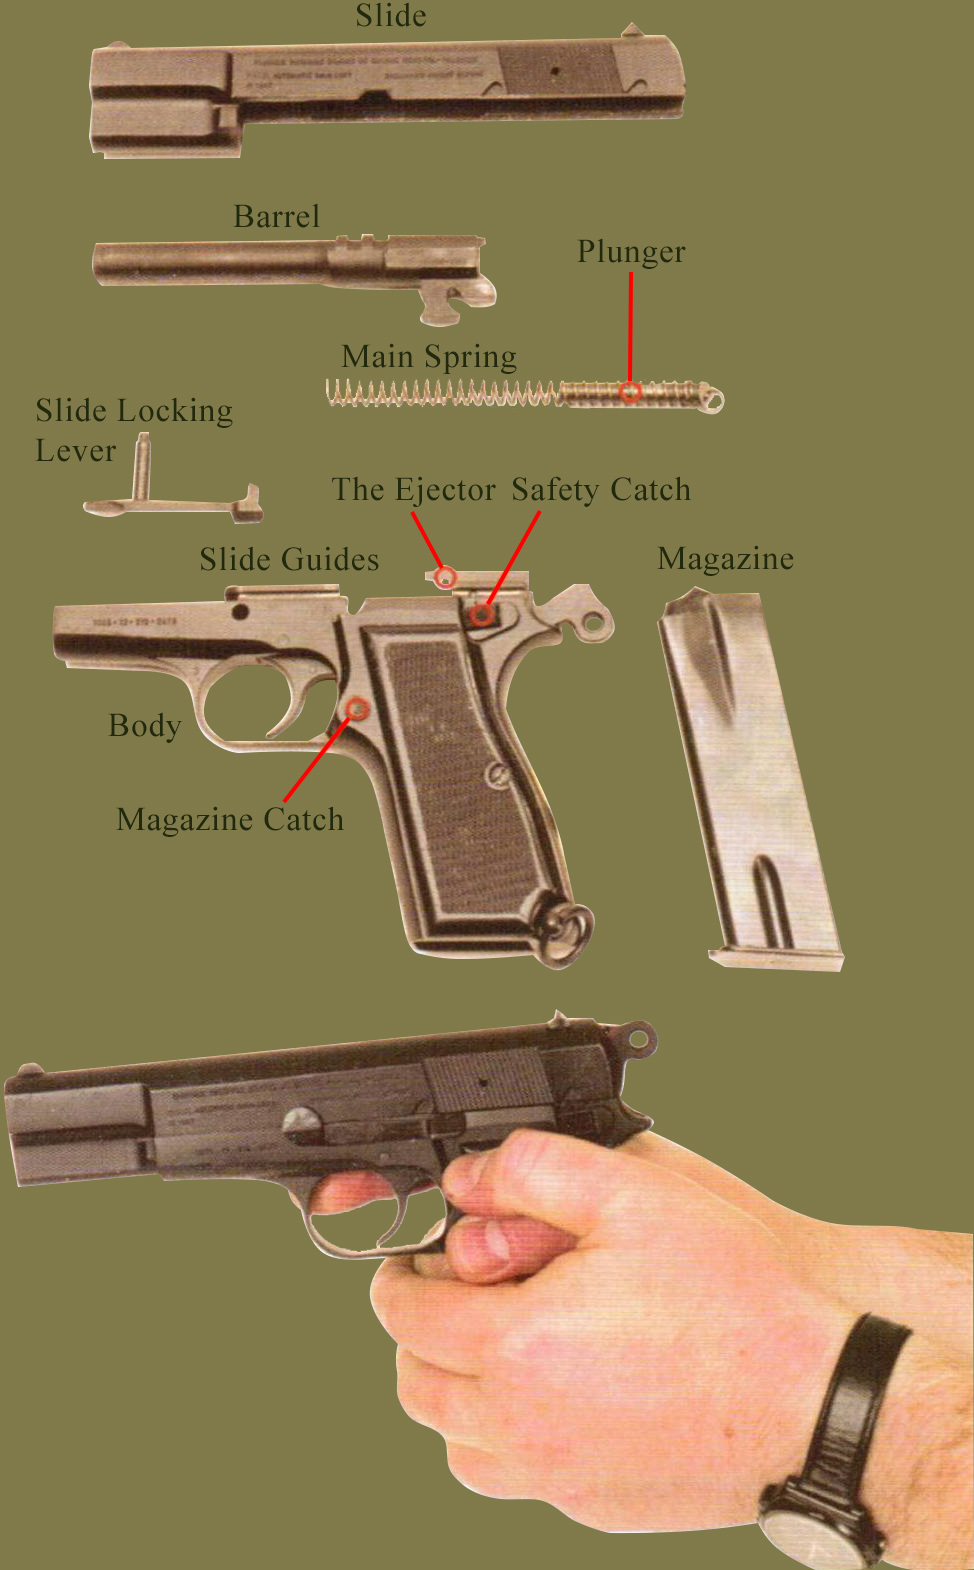
SAFETY PRECAUTIONS AND SAFE HANDLING
Normal safety precautions are to be carried out at the beginning and end of every lesson, practice or range period and immediately on returning to barracks, bivouac, tent or operational base and on completion of any patrol or duty.
◉ Adopt the 'draw pistol' position.
◉ Point weapon in a safe direction.
◉ Remove magazine, if fitted.
◉ Push up the slide locking lever and at the same time draw back the slide until the locking lever has engaged.
◉ Check that the weapon is clear. If handing over, show the weapon is clear to the recipient.
◉ Release the slide by pulling the slide fully to the rear and allowing it to travel fully forward under control.
◉ Put on an empty magazine, point the weapon in a safe direction and operate the trigger, remove the magazine.
◉ Place the pistol in its holster or hand it over, as applicable.
THE PISTOL CAN EASILY BE POINTED IN A POTENTIALLY DANGEROUS DIRECTION. THEREFORE, IT CAN BE A DANGEROUS WEAPON IF HANDLED CARELESSLY
◉ At night, or during poor light conditions, the chamber should be physically checked.
NOTE:
Before commencing stripping ensure that the pistol is clear.
NORMAL CONDITIONS
Dry clean, then examine for damage, stains or wear. Lightly oil the weapon and magazine.
HEAVY RAIN AND DAMP CONDITIONS
More oil should be applied to the metal parts and a careful watch kept for rust forming. In heavy rain the application of graphite grease will improve weapon operation.
TROPICAL HUMID CONDITIONS
Clean as normal but use the special issue lubricant, anticipating a rapid return of rust.
COLD AND EXTREME COLD CONDITIONS
Clean as normal but use oil sparingly. If the temperature warrants, a special lubricant will be issued.
DRY, SANDY OR DUSTY CONDITIONS
In such conditions the pistol must be kept dry. All traces of oil should be removed from the weapon by wiping with a dry rag. If rust appears remove it as normal, but take care to remove any oil that remains. Occasionally empty the magazines and tip out any grit.
LOADING
◉ Draw pistol from holster. Adopt the 'draw pistol' position.
◉ Check the top round is seated correctly in the magazine.
◉ Fit the magazine to the pistol, making sure that it is secure.
◉ Return pistol to holster, fasten holster.
UNLOADING
◉ Adopt the 'draw pistol' position.
◉ Remove the magazine.
◉ Draw back and lock the slide open.
◉ Check that the weapon is clear.
◉ Release the slide.
◉ Replace a magazine, point the pistol in a safe direction, then operate the trigger.
◉ Remove the magazine, replace the pistol and magazine in the holster and fasten the holster.
◉ Pick up the ejected round.
MAKING READY
◉ Draw the pistol quickly. Place the finger outside the trigger guard.
◉ Grip the rear of the slide on the ribbed part; pull the slide back sharply, let it go and apply the safety catch.
MAKING SAFE
◉ Unload the pistol as taught.
◉ Load the pistol with a full magazine.
FUNCTION TEST
On completion of assembling the pistol, carry out the following function test:
◉ The Safety Catch: Cock the pistol and apply the safety catch, fit an empty magazine and operate the trigger two or three times. The hammer should not go forward.
◉ The Half Bent: The half bent is a safety device designed to prevent a loaded pistol being fired should it be dropped. The half bent must never be used as a safety catch. To test this feature:
◉ Pull back the slide approximately 15mm, which will cock the hammer on the half bent, release the slide. Operate the trigger, the hammer should remain back.
◉ With the right thumb cock the hammer fully to the rear and operate the trigger. The hammer should go forward.
◉ If the pistol fails any of these tests, the pistol is to be repaired by an armourer.
IMMEDIATE ACTION (IA) ON STOPPAGES
◉ Take cover.
◉ Look at the position of the slide.
◉ If the slide is to the rear and the magazine is empty, change the magazine, pull back and release the slide and go on firing.
◉ If the slide is fully or partially forward, pull it back, hold it back by applying the slide locking lever and look into the chamber and magazine.
◉ If there are rounds in the magazine and no loose rounds or empty case in the body or chamber, check that the magazine is correctly fitted, release the slide and go on firing.
◉ If there is a live round or empty case in the body or chamber, shake it out, release the slide and go on firing. If the obstruction cannot be cleared by shaking, remove the magazine and prise out the obstruction.
◉ Rounds taken out of the magazine, or half fed rounds from the body or chamber, are not to be used again.
◉ If, when firing on the range, the recoil of the pistol is less than usual, the report of the shot is muffled, or if there is an unusual amount of smoke or any combination of these three things, unload at once. Do not go on firing until the pistol has been stripped and the bore has been examined to make sure that no bullet has lodged in the barrel. To fire the pistol in this condition is dangerous to the firer and to those near him.
We have much more interesting information on this site.
Click MENU to check it out!
∎ cartalana.com© 2009-2025 ∎ mailto: cartalana@cartalana.com