
RICHARD NATKIEL
ATLAS OF WORLD WAR II
Cruewell's isolated forces were finally supplied on 4 June, and Eighth Army failed to counterattack until 5/6 June, when it was beaten off with heavy losses. The defense at Bir Hacheim crumbled and DAK broke out of the Cauldron to force the British back from the Gazala Line even beyond Tobruk. Axis forces had surrounded the British garrison there by 18 June.
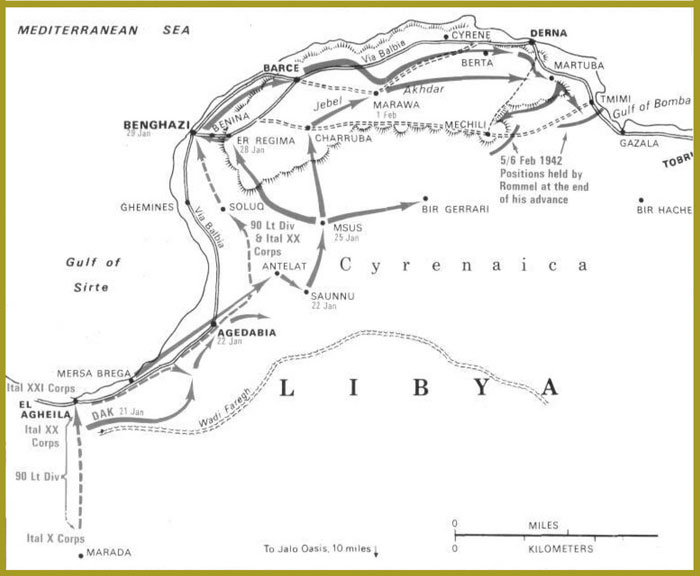
Rommel advances eastwards, pushing the Eighth Army back toward Gazala and Tobruk.
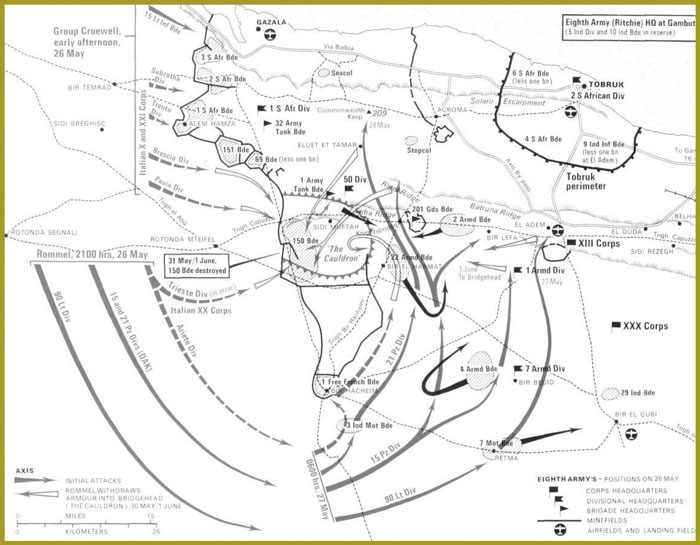
The Allied stand on 26 May, with fortified keeps (shaded) scatteredlong the minefield (bold line).
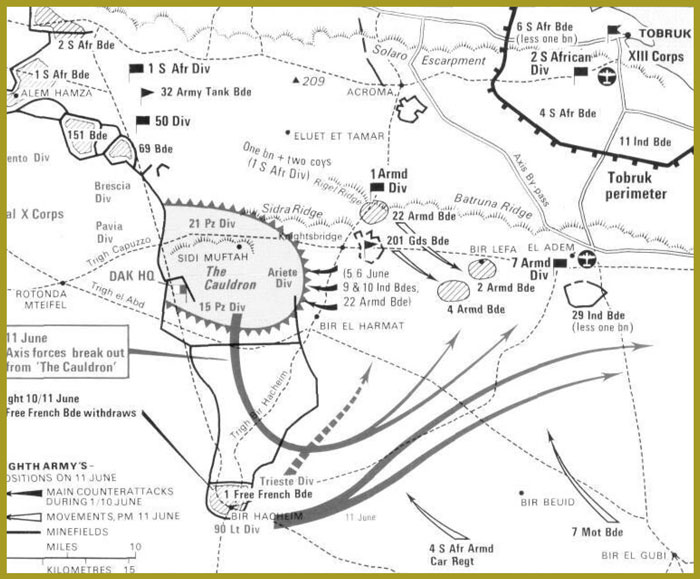
Breakout from the Cauldron.
An Afrika Korps Panzer III advances.
Eighth Army was severely demoralized by the German triumph at Gazala, which contributed to the distrust between infantry and tank units that had surfaced during the Crusader Battles. British leadership had failed to capitalize on several advantages, including a numerical superiority in armor, the DAK containment in the Cauldron and the well-prepared defense line at Gazala.
Rommel launched his drive on Tobruk from the southeastern sector on 20 June 1942. Heavy dive-bomber attacks displayed German air superiority to devastating effect, after which DAK pushed through the perimeter defenses. By mid- morning German troops had reached the minefields, and the airfields were overrun soon after. At 1900 hours 21 Panzer Division moved into Tobruk.
There was sporadic fighting within the perimeter through the night, but the Germans had overcome almost all resistance by the morning of 21 June. General Klopper, the South African in command of the garrison, surrendered, and the road to Egypt was open.
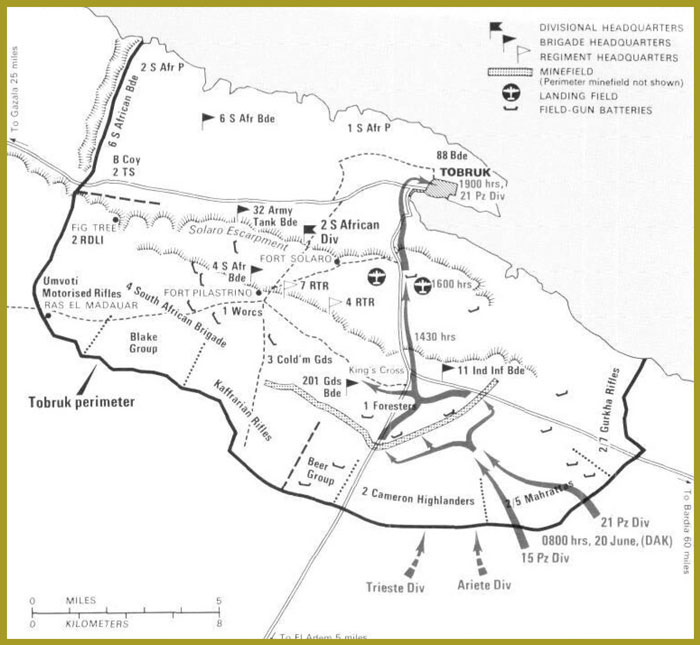
The perimeter defenses are breached, and the fall of Tobruk is less than 12 hours away.
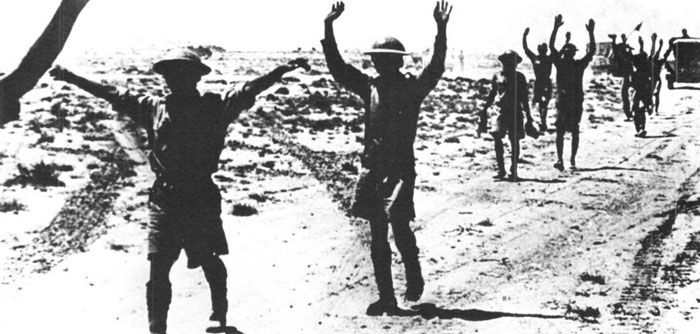
British troops surrender to their Axis adversaries. Rommel's victory, completed on 21 June, cleared the way for an advance into Egypt.
The Naval War in the Mediterranean
The Royal Navy faced a difficult task in the Mediterranean, where the well-equipped and modern Italian Navy enjoyed a position from which it could strike at will. British forces were split between Gibraltar (Force H) and Alexandria, with Malta at the center - a key position, but highly vulnerable. Only light and submarine naval forces were based on Malta, and Mediterranean Fleet commander Sir Andrew Cunningham was constantly seeking ways to enhance the British position in the Mediterranean through flexible use of his surface ships, including a limited number of carriers.
Cunningham's forces scored several successes against the Italian Navy in chance encounters during July 1940, and plans were laid to attack the Italian fleet in harbor at Taranto. On the night of 11 November, 21 Swordfish torpedo- bombers were launched from the carrier Illustrious: all but two returned, having sunk the new battleship Littorio and two modernized battleships and inflicted heavy damage on other craft. It was a major coup for the British, and soon followed by another successful strike at Cape Matapan, Greece.
Italian naval forces moved toward Greece in late March 1941, to interdict convoys carrying British troops to assist the Greeks during the Axis invasion of the Balkans, then imminent. On 27 March, RAF scouts reported three Italian cruisers heading east, and Admiral Cunningham put to sea from Alexandria. Three battleships, an aircraft carrier and destroyer escorts comprised his force, which was to rendezvous south of Crete with Vice-Admiral IID Pridham-Wippell commanding a force of four cruisers and four destroyers.
The principal target among the Italian force converging south of Crete was the battleship Vittorio Veneto, the pride of Mussolini's fleet. Air strikes were launched against her, but only one torpedo found its mark. Then the Italian cruiser Pola was heavily damaged, and the heavy cruisers Zara and Flume were sent back to help; all three were destroyed.
The remainder of the Italian force fled back to its bases, including the Vittorio Veneto, which found safe harbor at Taranto to the disappointment of Admiral Cunningham and his men.
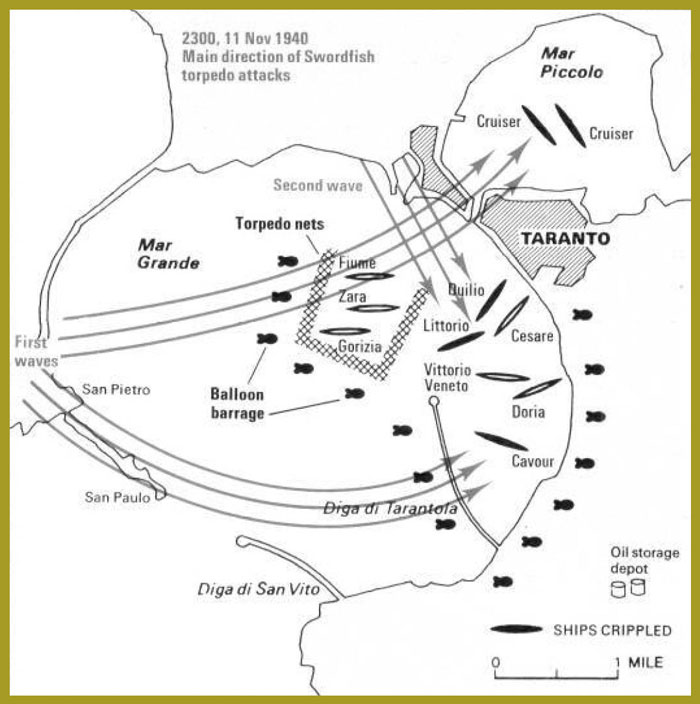
The successful night attack on the Italian fleet in Taranto on 11 November 1940 mounted by 21 Swordfish torpedo- bombers from HMS Illustrious.
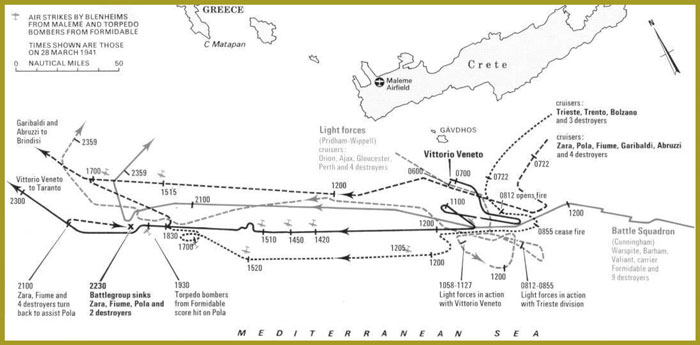
A second blow was dealt to Italian naval might at Cape Matapan on 28 March 1941.
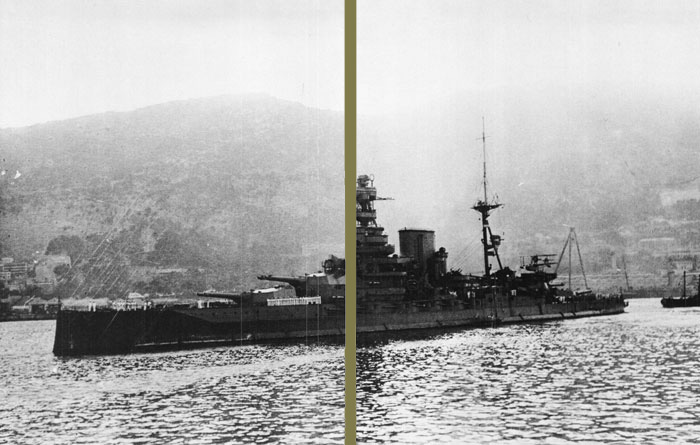
HMS Barham, a battleship of the Allied Mediterranean fleet, at Gibraltar.
The British island fortress of Malta was in serious straits by mid 1942. Its location astride Axis supply lines made it the target of incessant air attack, and its own supply lines were increasingly tenuous. Convoys to Malta had to be suspended in July due to their heavy losses. It was clear that Malta could not hold out against both the Luftwaffe and the Italian Regia Aeronautica without food or fuel, and Operation Pedestal was mounted as a desperate effort to convoy supplies from England.
Twenty warships under command of Vice-Admiral E N Syfret left the Clyde on 3 August with 14 merchantmen, 32 destroyers and various smaller craft. The aircraft carrier Furious accompanied the group with a cargo of fighter planes for Malta's RAF squadron. On 10 September, when the convoy passed through the Strait of Gibraltar in fog, a dummy convoy was dispatched from Port Said toward Malta as a diversion. Next day it returned to port, having failed to distract Axis leaders from the main operation, which was shadowed by reconnaissance aircraft from the morning of 11 September. That afternoon Furious flew her planes off to Malta and turned back, and the Axis made its first overt move in the form of a U-boat attack on the carrier Eagle, which was sunk.
The next day brought heavy Allied losses to Axis planes and submarines. The freighter Deucalion went down, the destroyer Foresight was so badly damaged that she had to be sunk and the Indomitable's flight deck was bombed out of operation. At this point Syfret turned back according to plan, leaving Rear Admiral H M Burrough to escort the convoy the rest of the way with four cruisers and four destroyers. Two of the cruisers were disabled in the next few hours, Cairo so badly that she had to be sunk. At dusk, two of the merchantmen were destroyed and one damaged. The American tanker Ohio was hit but stayed with the convoy, as did the damaged cruiser Kenya.
Early on the morning of 13 September, five more merchantmen and the cruiser Manchester were lost to torpedoes, and renewed air attacks sank Wairanama and did additional damage to Ohio, with its irreplaceable fuel cargo. By the time light forces from Malta met the convoy, all but five of the merchantmen had been sunk, along with one aircraft carrier, two cruisers and a destroyer. But the fuel and other supplies that got through enabled Malta to hold on.
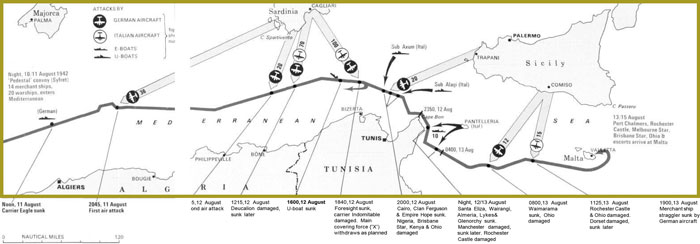
The hazardous passage to Malta.
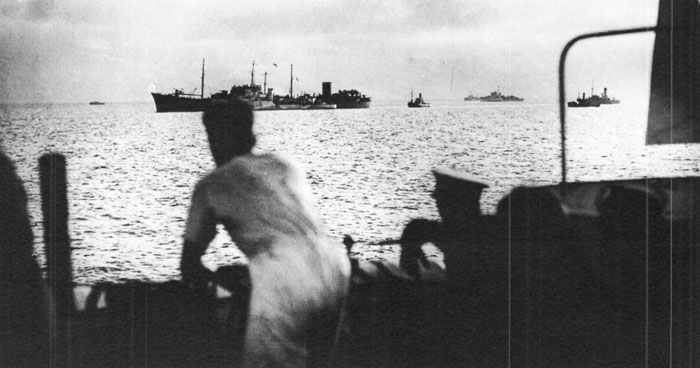
The damaged tanker HMS Ohio limps toward port with destroyer escort.
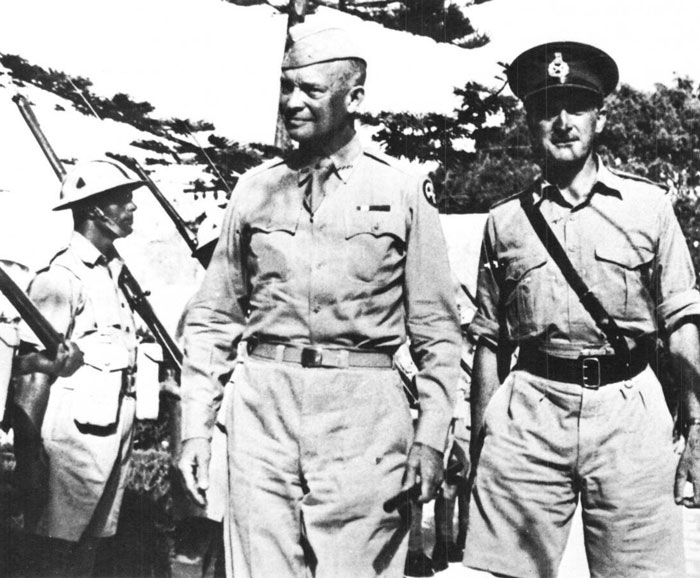
General Eisenhower (left) on Malta with Viscount Gort, the island's governor.
The German tanks advance, with Italian support.
The first Battle of El Alamein.
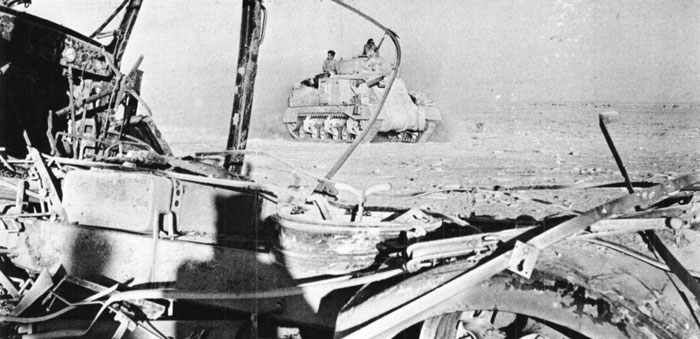
General Grant tanks of the A Uied 22nd Armored Brigade advance south of El Alamein.
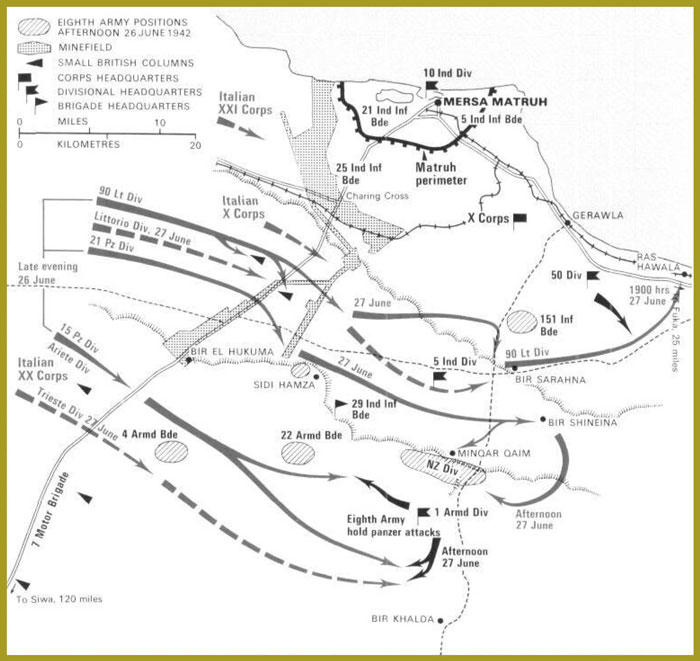
After the fall of Tobruk, Rommel was promoted to Field Marshal, a status that strengthened his argument for advancing to Egypt at once. (The original Axis plan called for a halt while naval and air forces massed to invade Malta.) Using the supplies newly captured at Tobruk, Rommel crossed the Egyptian frontier and attacked the British at Mersa Matruh (26-27 June), where Eighth Army was now under tactical command of General Claude Auchinleck, Commander in Chief, Middle East. The British could not contain the German advance and retreated to the next defensible position - a line south from the small rail station of El Alamein.
Auchinleck had few reserve units with which to prepare his position from El Alamein, near the coast, to the Qattara Depression, an area of wilderness that was considered almost impassable. His depleted forces took their positions along this line to bar the way to the Nile. Meanwhile, Rommel's forces had also been much reduced in recent battles - to some 2000 German infantry and 65 tanks - while fuel and other supplies were dwindling (these had consisted largely of booty captured at Tobruk and Mersa Matruh).
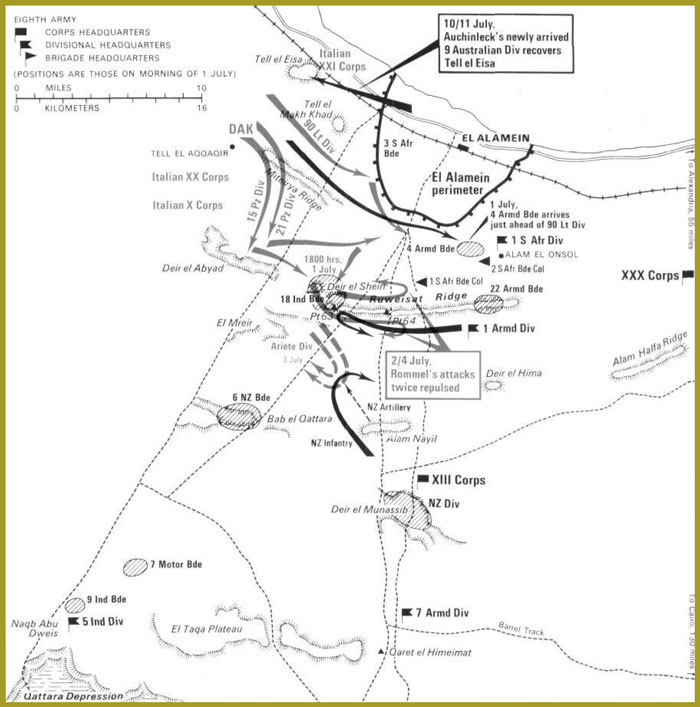
Eighth Army's artillery units were instrumental in repelling the first German and Italian attacks on 2-4 July; their coordination was much better than it had been under General N M Ritchie from whom Auchinleck had assumed command. The British Commander in Chief was now in a position to essay some limited counterattacks, whose targets were Italian rather than German divisions. This choice was deliberate, as it compelled Rommel to waste fuel in widespread efforts to assist his Italian cohorts.
The Sabratha unit fell to the 9 Australian Division on 10-11 July, and the British recovered Tell el Eisa as a result.
Larger Allied efforts were mounted in the Ruweisat Ridge area, where opposing forces grappled to an exhausted standstill. Both sides were simply worn out, and Auchinleck's refusal to continue the attacks known collectively as the First Battle of El Alamein was to cost him his command.

The Allied retreat along the Mediterranean coast to El Alamein.
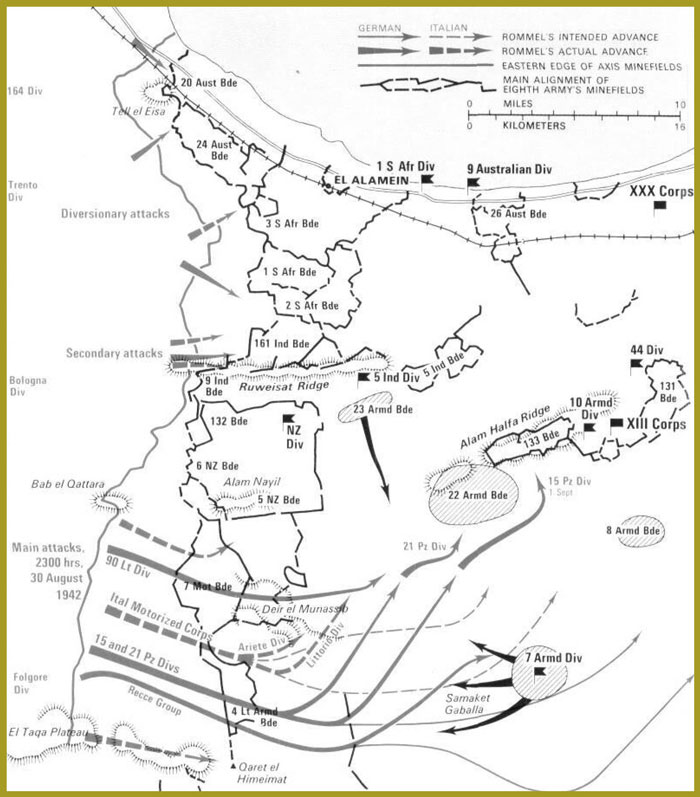
In August 1942 Churchill arrived in the Middle East to make changes. General Harold Alexander replaced Auchinleck as Commander in Chief, and General Bernard Montgomery took charge of Eighth Army. Less than three weeks later, he would face Rommel's last attempt to break through the position at El Alamein.
Montgomery's defensive plan was based loosely upon Auchinleck's: to hold the Alam Haifa Ridge and counter a German threat in the South with 7 Armored Division. Rommel used the tactic this plan had anticipated when, on 30 August, his main attacks swung south of the British positions with the object of turning north again beyond Alam Haifa to surround Eighth Army. The presence of 7 Armored Division on the right flank forced him to turn north earlier than he had intended, with the result that DAK failed to break through the Alam Haifa position. Harassing air attacks and a shortage of fuel compounded Rommel's difficulties. His 15 Panzer Division tried to outflank 22 Armored Brigade on 1 September, but this effort was stymied by an improved British antitank system. Axis forces pulled back to prepare a deep defensive position between the Qattara Depression and the sea.
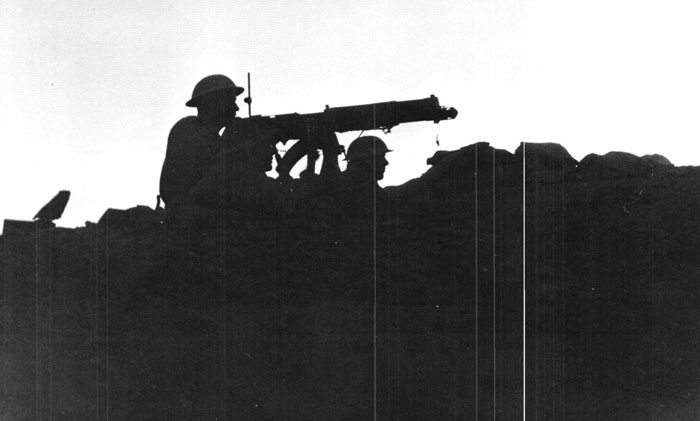
A Vickersgun noses over the barricades.
We have much more interesting information on this site.
Click MENU to check it out!
∎ cartalana.com© 2009-2025 ∎ mailto: cartalana@cartalana.com